Developing in AWS Lambda with Serverless Framework
View CodeServerless or Function as a Service, in a nutshell, is composed of some function and events configured for it. When the event is triggered, the function will be executed and whatever is returned by the function becomes the output. You are only charged for the time your function is executing. This is currently the highest level of abstration available. You don’t have to worry about deploying or scaling the function. By definition, High Availability and Auto-Scaling is built into the application.
AWS came up with the first serverless service called AWS Lambda and it is currently the biggest player in the space. With Lambda, you can write functions in Node.js, Python, Java and even C#. You are charged for every 100ms the code is executing. It is also connected to other services within AWS ecosystem. Other popular services are Google Cloud Functions, Azure Functions and Apache OpenWhisk.
In this article, we will create a sample application using AWS Lambda and Serverless framework to find latency between different regions within AWS. The code for this application can be found here.
Why Serverless Framework?
Serverless is a framework that helps with the development in serverless platforms. In the traditional development with AWS Lambda, you need to write the function, add the dependencies, archive all the files to a .zip file and upload it in the console and setup its configurations. This is not a streamlined approach for Serverless development. The following are some of the problems that this method has, which can be solved using Serverless Framework.
Hard to deploy
Every time, you make some changes, you would have to archive the files to a .zip file and upload it. This process is even more difficult if you have multiple dependent functions or services. Once you have setup the serverless framework, you can deploy the latest version of the code with the a single command, sls deploy.
No declarative configuration
If you are configuring the lambda functions from the AWS console, you have to fill a lot of fields up. You also have to go to a bunch of other services and set it all up. This makes it difficult to share your code. The functions will come with long set of steps for its configuration and deployment. With serverless framework, you can provide all the configuration related to the functions in a file called serverless.yml. This file will contain the information about the service provider and all the functions. You can also add additional resources needed for the functions in the file.
Hard to test locally
With the console way, you can’t really test the functions locally before deploying it. With serverless framework, you can invoke the functions manually with the sls invoke command. If the function name is test, you can invoke it locally with sls invoke local -f test. You can also run the version deployed in the AWS using the command, sls invoke -f test. If you need to pass any JSON data to the functions, you can save the data to a file and give its path with the sls invoke command. So, if the data file is data.json and it is in the same folder as serverless.yml, the command becomes sls invoke local -f test -p data.json
Hard to get logs
With the console method, you have to go the CloudWatch and watch the logs. In the serverless framework, you can see the logs with the command, sls logs. To see the logs for the function test for the last 5 minutes, you can use the command sls logs -f test --startTime 5m. You can also stream the logs to the console using sls logs -f test -t.
These are some of the issue that serverless framework solves for you. When you run the sls deploy command, the following things happen:
- The entire code base is archived to a
.zipfile. - A
S3 bucketis created and the archived file is uploaded to it. - In the case of AWS, the framework reads the
serverless.ymlfile and creates correspondingCloudFormationtemplates. This templates will contain the instructions to create lambda functions using the archived file from S3 bucket. It will also included the addtional resources and policies that is present in theserverless.ymlfile. - The template created is pushed to the S3 bucket and it is executed. This creates all the functions and dependent services.
Installing Serverless Framework
Serverless is essentially an Node.js CLI and it is available as a NPM package. So, you need to have Node.js and npm installed in the system. If it is not already installed, check here to download the latest version. Once Node.js and npm is installed, you can install serverless framework with,
npm install -g serverlessYou can now use the serverless framwork using the command serverless or sls. Now, you need to connect your AWS account to serverless. For this, you need to have AWS Access Keys. To generate these, you can check here. You will now have an Access Key ID and a Secret Access Key. Now you can associate serverless with your AWS account with the command,
serverless config credentials --provider aws --key <Access Key ID> --secret <Secret Access Key>Demo Application
Now, we are ready to start developing in AWS Lambda with serverless framework. We will build a sample application that does ping test to see the latency between different regions with AWS. We will deploy the application in one region and we can see the latency from that region to other regions. The result of the ping tests will be stored in a S3 bucket. As the input, we will use a JSON file with the list of regions and end-points. The code for this application is in javascript and the runtime used is Node.js 6.10.
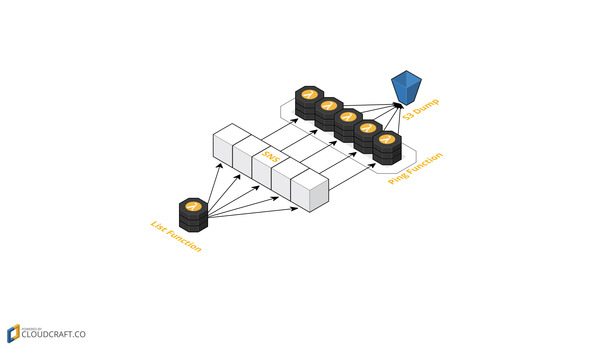 Demo Application Architecture
All the ping tests are independent to others, so we can run it in parallel. To do this, we use AWS Simple Notification Service (SNS). SNS is bascially a notification service from AWS. With SNS, we can have multiple topics and each topic can have multiple subscribers. When a message is published to the topic, all its subscribers are notified. Here, we use one lambda function called list to read from the input and publish message for each item in the data to a SNS topic. The second function, ping becomes the subscriber for this topic. So each message published to the SNS topic will trigger lambda functions that will run in parallel. All these lambda function will run ping test for one region and stores the result in a S3 bucket.
List Function
List function should read from the JSON data and publish each entry as a message to a SNS topic. The data file data.js looks this,
module.exports = {
  'N.Virginia'      : 'ec2.us-east-1.amazonaws.com',
  'Ohio'            : 'ec2.us-east-2.amazonaws.com',
  'N.California'    : 'ec2.us-west-1.amazonaws.com',
  'Oregon'          : 'ec2.us-west-2.amazonaws.com',
  'Canada'          : 'ec2.ca-central-1.amazonaws.com',
  'Frankfurt'       : 'ec2.eu-central-1.amazonaws.com',
  'London'          : 'ec2.eu-west-2.amazonaws.com',
  'Singapore'       : 'ec2.ap-southeast-1.amazonaws.com',
  'Sydney'          : 'ec2.ap-southeast-2.amazonaws.com',
  'Mumbai'          : 'ec2.ap-south-1.amazonaws.com',
  'SãoPaulo'        : 'ec2.sa-east-1.amazonaws.com'
}
We have a object with the region names as the keys and its URL endpoint as the values. We will be doing the ping test to the endpoints and save the results in S3 bucket as files named with the region name. This is just sample data that points to the EC2 endpoint in each region. The javascript file that contains the main function, index.js is given below.
'use strict';
const AWS = require('aws-sdk'),
      data = require('./data');

module.exports.handler = (event, context, callback) => {
  const split = context.invokedFunctionArn.split(':'),
        topic = `arn:aws:sns:${split[3]}:${split[4]}:${process.env.TOPIC_NAME}`,
        sns = new AWS.SNS();

  for (let item in data) {
    sns.publish({
      Message: JSON.stringify({
        region: item,
        url: data[item]
      }),
      TopicArn: topic
    }).promise().catch(err => console.log(err.stack));
  }

  callback(null);
};
The code will be run on Node.js 6.10 runtime and it is in ES6. So, we start by choosing strict mode. We will import aws-sdk to publish messages to SNS and the data file, data.js. The handler function is the one that should be executed when the event is triggered. It receives three paramaters:
event: This will contain information related to the event that triggered this function. If the event configured in anAPI Gatewayendpoint, you receive the URL, request headers and so on.context: This will contain the information about the AWS account that runs the function. You can fetch your AWS account number and region from this.callback: This is a function that should be called to return values from the function. In the case ofAPI Gatewayevent, this is where you will provide the response.
The first thing we do in the function is to get the ARN for the SNS topic that we need to publish to. This will be in the format arn:aws:sns:<region>:<account number>:<topic name>. We are parsing the context object to get the account number and the region. We are getting the topic name from environment variables. We will talk more about this while writing serverless.yml file. Now, for every key in the data, we will publish a new message to SNS topic. We use the sns.publish() function for this. The Message will contain region name as region and endpoint as url, converted to string. Also TopicArn parameter will contain the topic name. We will also apply a catch clause for error handling. Finally, as we don’t have to return anything from this function, we end with callback(null). Put both data.js and index.js in the folder list placed in the root of the project.
Ping Function
The ping function is triggered by the SNS topic. Each instance of the function will act on one message or one region. It will receive the endpoint for one region and the ping test is done on it. The result is then saved into a S3 bucket with the region name as the file name. This function is given below in the file index.js.
'use strict';
const Promise = require('bluebird'),
      ping = Promise.promisify(require('tcp-ping').ping),
      AWS = require('aws-sdk');

module.exports.handler = (event, context, callback) => {
  if (event && 'Records' in event) {
    const body = JSON.parse(event.Records[0].Sns.Message);

    ping({ address: body.url }).then(data => {
      let s3 = new AWS.S3();
      s3.putObject({
        Bucket: process.env.BUCKET_NAME,
        Key: body.region,
        Body: JSON.stringify(data)
      }).promise().catch(err => console.log(err.stack));
    }).catch(err => console.log(err.stack));
  }
};
We start by importing tcp-ping to do the ping test, bluebird to promisify the ping test and aws-sdk to write the result to S3. As before, handler is the function triggered by the event. The message received from the SNS topic will be found at event.Records[0].Sns.Message and we parse it to body. We will do the ping test on the endpoint, body.url with ping function.
We now have to write the result of the ping test to the S3 bucket. For that, we will create a new S3 object and call its putObject method. The Bucket name is obtained from the environment variable. The Key, or the file name, is the region name and is found at body.region. The Body of the file is the result of the ping test as a string. As before, we add a couple of catch clauses for error handling. Put this file index.js inside the folder ping placed in the project root.
Serverless Files
To manage the dependencies of this Node.js project, we need to have a package.json file. We are using aws-sdk, bluebird and tcp-ping as the npm dependencies. So the package.json file will look like this.
{
  "name": "serverless-ping",
  "dependencies": {
    "aws-sdk": "^2.55.0",
    "bluebird": "^3.5.0",
    "tcp-ping": "^0.1.1"
  }
}
Now, we come to the serverless.yml file. The configuration file of this project for serverles framework. It will contain configuration related to the service provider and each function. It also includes any additional resources needed for the project. To know more about this file, check here. The file for this project looks like this.
service: ServerlessPing
custom: ${file(env.yml)}

provider:
  name: aws
  stage: dev
  runtime: nodejs6.10
  region: us-west-2
  environment: ${file(env.yml)}
  iamRoleStatements:
    - Effect: 'Allow'
      Action: 'SNS:Publish'
      Resource:
        Fn::Join:
          - ':'
          - - 'arn:aws:sns'
            - Ref: 'AWS::Region'
            - Ref: 'AWS::AccountId'
            - ${self:custom.TOPIC_NAME}
    - Effect: 'Allow'
      Action: 'S3:PutObject'
      Resource:
        Fn::Join:
          - ''
          - - 'arn:aws:s3:::'
            - ${self:custom.BUCKET_NAME}
            - '/*'

functions:
  list:
    handler: list.handler

  ping:
    handler: ping.handler
    events:
      - sns: ${self:custom.TOPIC_NAME}

resources:
  Resources:
    PingBucket:
      Type: AWS::S3::Bucket
      Properties:
BucketName: ${self:custom.BUCKET_NAME}
We start with the project name, ServerlessPing in this case. We can add custom variables from external files to this file. We use this to setup environment variables and to use those values in this file. This lets us store secret values within the project that we don’t want to share with the code. In this case, we have a file for environment variables called env.yml. This file looks like below:
TOPIC_NAME: ping
BUCKET_NAME: awspingdump
Here, the TOPIC_NAME refers to the name of the SNS topic and the BUCKET_NAME refers to the S3 bucket to store the results in. As all the S3 buckets should have a unique name, you would have to change the BUCKET_NAME to something else. To refer to these values in the serverless.yml, we use the custom key which is directed to the env.yml file.
With the provider object in serverless.yml, we will setup configuration related to the service provider. These are common for all functions. Here, the name of the provider is aws and the stage is currently dev. As the function goes for production, you can change stage to prod. As the code is javascript, we ues Node.js 6.10 as the runtime. Also, we set the region to deploy the function as us-west-2. To move it to some other region, just change this field. We also need to use the file env.yml to set the environment variables. For this, we use the environment field and we point it to external file env.yml.
Next, we will set the iamRoleStatements. This is to set permission to be applied to the functions. In our case, we need the function to able to publish to SNS topic and put files in S3. To know more about this, check here. For each entry in iamRoleStatements, we need to mention three fields: Effect which could be Allow or Deny, Action and Resource name.
The first statement is to be able to publish to SNS. The Effect is Allow and Action is SNS:Publish. As discussed before, the name of topic is in the format arn:aws:sns:<region>:<account number>:<topic name>. To construct this, we use Fn::Join which joins the list of items with a delimiter, which is : in this case. We start with arn:aws:sns, to which we append AWS region name with Ref: 'AWS::Region' and AWS account number with Ref: 'AWS::AccountId'. Finally, we also append the topic name obtained from the env.yml file, which is read from the custom field. This can obtainer with ${self:custom.TOPIC_NAME}.
The second statement is to be able to put files into S3 bucket. The Effect is Allow and Action is S3:PutObject. To give permission to write to a bucket, we need to give resource name in the format arn:aws:s3:::<bucket name>/*. As before, we will construct this using Fn::Join, but now the delimiter is blank. We start with arn:aws:s3:::, to which we append the bucket name from the custom field, with ${self:custom.BUCKET_NAME} and /*.
After the provider configuration, we set up configuration for each function. The first function is list. Handler for this function is handler in the file index.js in the list folder, so that is given as list.handler. For this demo, we will run this function manually with sls invoke command. You can set up a variety of events for each functions. You can see more about events here.
The second function is ping. As before, the handler for it is handler within index.js in ping folder. So, handler becomes ping.handler. This function is to be triggered by the SNS topic. which makes the event sns. The topic name is obtained from the custom field, so the topic name is ${self:custom.TOPIC_NAME}.
Finally, we need to provision a S3 bucket to store the results. We add the resources object to this file for this. We have a resource named PingBucket, which is a S3 bucket or AWS::S3::Bucket. For properties, we give the name of the bucket from the value in the custom field: ${self:custom.BUCKET_NAME}.
Deploying Application
Place the files serverless.yml, env.yml and package.json in the project the root. It should also contain the list and ping folder. We can import the dependencies with the command,
npm installWe are now ready to deploy this application, which can done with a single command.
sls deployThis will archive the project file and push it to S3; create the necessary cloudformation template to deploy the function and events; and create the additional S3 bucket. After the deploy is done, you can see the Lambda jobs, SNS topics, and S3 buckets created. If you make any changes, you can deploy the changes with the same sls deploy command. We will now manually trigger the list function, which will trigger multiple ping functions and fill up the S3 bucket with ping test results.
sls invoke -f listNow if you check the S3 bucket, you can see the files for each region. Each file will contain the JSON result of the ping test of that region.
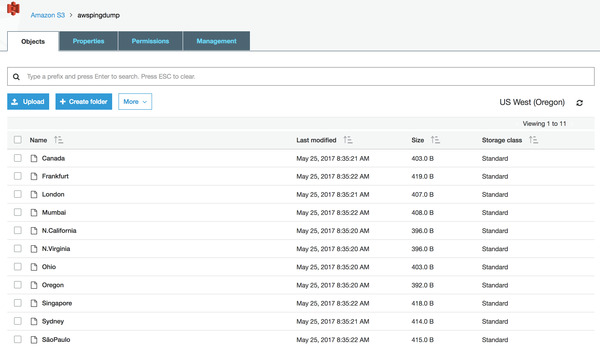 Ping results in S3
Conclusion
In this article, we have made an introduction to serverless with AWS Lambda and Serverless framework. We have also designed an application to leverage the advantages provided by the serverless approach and deployed it using serverless framework to AWS Lambda. This approach can be used in a wide variety of use-cases to get high-available application at a fraction of the cost.
You can remove the complete function off AWS with the command sls remove. This will remove the functions, events and any additional resources.