Continuous Integration is the technique where certain tasks are done automatically with each commit. These involve building, running unit tests and deploying. TravisCI and Wercker are two popular hosted continuous integrations tools available. In this article, we will compare these two and then we will see how to build and deploy a Node.js application to OpenShift.
The working demo for this article is hosted here and the code for this can be found here. It is a simple Node.js application with Mocha unit tests.
Hosted Continuous Integration
Hosted Continuous Integration is a cloud service to which we need to connect our code repository. It will then listen for any commits pushed to the repository. Every time that happens, it will run the certain tasks based on your configurations. These tasks include:
- Building the application
- Running unit tests
- Checking code quality
- Deploying application
- Notify the developers with the results
Travis CI
Travis CI is the most popular hosted Continuous Integration tool in the market. The configurations for Travis CI is given in the file .travis.yml which is added to the root of the repository. The advantages of Travis CI when compared to wercker are:
- Easy to setup and use
- Faster build and deploy time
- Better documentation
- Test with multiple versions of your language
Wercker
Wercker is relatively new but it is becoming really popular. You need to add configurations to wercker.yml which is again placed in the root of the repository. The advantages of wercker when compared to Travis CI are:
- Free for both private and public projects while Travis CI is only free for private projects
- Better User Interface
- Connects to both GitHub and BitBucket, while Travis CI only connects with GitHub.
The App
For this article, we have a really simple Node.js application, as simple as it gets. It is a web server which always return the same message. You can see the code here. The server is made in index.js file which is given below.
var http = require('http');

const PORT = process.env.OPENSHIFT_NODEJS_PORT || 8000;
const IP = process.env.OPENSHIFT_NODEJS_IP || '127.0.0.1';

function handleRequest(request, response) {
  response.end(`Web server running on Node.js v${process.versions.node}.`);
}

var server = http.createServer(handleRequest);

server.listen(PORT, IP, function() {
  console.log(`Server listening on http://${IP}:${PORT}`);
});
Now, we will add some unit testing to the application using Mocha, a javascript test framework. The nature of the tests don’t matter to this article. We can just use one of the sample test given in the Mocha website. Create a file /test/test.js with the tests.
var assert = require("assert");

describe('Array', function() {
  describe('#indexOf()', function() {
    it('should return -1 when the value is not present', function() {
      assert.equal(-1, [1, 2, 3].indexOf(5));
      assert.equal(-1, [1, 2, 3].indexOf(0));
    });
  });
});
The package.json must contain the start and test scripts. The test script is mocha in this case. It should also contain mocha as a development dependency.
{
  "name": "openshift-travis-wercker",
  "main": "index.js",
  "scripts": {
    "start": "node index.js",
    "test": "mocha"
  },
  "engines": {
    "node": ">= 4.0.0"
  },
  "devDependencies": {
    "mocha": "^2.3.2"
  }
}
There is a folder .openshift in the repository which is used to update node.js in openshift to the version we want, v4.0.0 in this case. I suggest you copy that folder into your repository. You can read more about this here. Once you have all these files, put this repository in GitHub. Now, create an application in OpenShift by cloning the repository that you have just created in GitHub. You can also create the application by cloning my repository. If there is any doubts there, check this out.
Deploy with Travis CI
Deploying to OpenShift with Travis CI is very simple and its documentation is really good. Before going to deploy, you need to setup the build procedure. For that you need to choose language and its version. Then we need to install the dependencies with npm install command and then run the tests using npm test command. So the .travis.yml will be like this.
language: node_js
node_js:
  - 4.0.0
install:
  - npm install
script: npm test
To add the deploy procedure, it’s easier with Travis CLI. Install the gem and run the command,
travis setup openshiftIt will fill in most of the fields. You have the option to encrypt the password, do that. Now, you can replace the field values with environment variables that you can set from Travis CI website. You can do that by going to the settings of your repository.
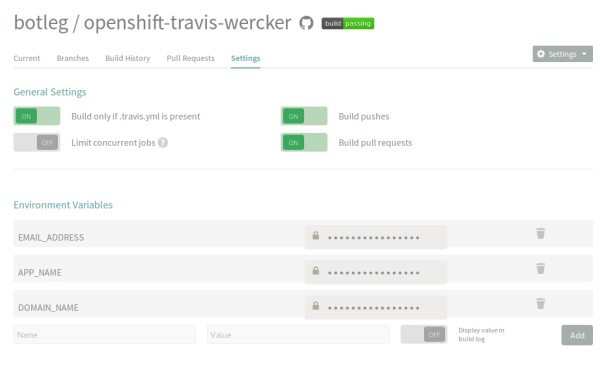 Travis CI Settings
You need to prefix $ to the environment variables when accessing them from the .travis.yml file, EMAIL_ADDRESS can be accessed as $EMAIL_ADDRESS in .travis.yml. So the complete file will look something like this.
language: node_js
node_js:
  - 4.0.0
install:
  - npm install
script: npm test

deploy:
  provider: openshift
  user: $EMAIL_ADDRESS
  password:
    secure: Y9et6C4ELvnvfXWpgUrdA/2suDULDW7SsT9SBG/AoQ2EGlOc0t48b/BJvt4R5coANrOe7trKcWwxJMmD8FJXmpNvWqUlbpbuLH8M8oeNp9dGgU0clfGW3ff00HuGuoH3hycyuysr7AzKbmRjffbirX2/Jh/NyMtLYzh78TNWa9LwculL9I/jmu+z1RLMrYgiZ2uOsG261RyQ8hOzu9LwOfUoFOtS3ozi0ExkxBddCItbfVnyidlpFX3gdBtabqu5Q0NFMiXHVQkMm9xjYqf0DASxVnqGF3MsJbfPpzvBJjdnYU92lUNt/yckkyV3jSrlm2WaqaprRfucC7UXwRrOXpxPatTSKnd5Xm/DnSNLzJCpGU1xJG0HUFihGtXlgF2mYTXu9A4BkrKuC9qA1i3Gt9ENrLpL8uGGvUKlNw19X0QEeTX4QQ2EItA7tACYHWPt0bIn/9TUFJ6FiB0M4K3OGIQltAcWSHbTKvP+AuFEAK9a9dxrF1EK1FtJhFaHJk0HahBB5JjG/aQfxOYEBJbfsAhP4fanwO63GmfzsU2rVq3qbHhQC/Jdr/mobz9rf+DmfkXWT4KfmDSjkI6eUg80Iv2ar7tc3E0McYADLxahwnVP37mO8yuLdS1Za+AaWLFBE3/S8YR8lWVgQCO9T1oklR7ZzD0K4ahdGUMpdQ3VqyY=
  app: $APP_NAME
  domain: $DOMAIN_NAME
  on: master
The on: master field here states that only the push in master branch will be deployed to OpenShift. Now, every time we push to GitHub repository, Travis CI with do the Mocha tests and deployment to OpenShift for us.
Deploy with Wercker
Deploying to OpenShift with Wercker is little more complicated. Here, we have build and deploy procedures are called pipelines with as many steps as we want for each. As before we need to start with the build pipeline. There we need to specify the language we use. The version of the language used is the latest by default. Then, we can set up the steps in the build pipeline. The first step is to display the versions on Node.js and NPM. Then we can run the npm-install step and npm-test step. So, the wercker.yml looks like this.
box: node
build:
  steps:
    - script:
        name: echo nodejs information
        code: |
          echo "node version $(node -v) running"
          echo "npm version $(npm -v) running"
    - npm-install
    - npm-test
Now we get to the deployment pipeline. Go to Wercker settings for your application and create a new ssh key pair named OPENSHIFT_SSH_KEY. You can then copy its public key to openshift. More about this can be found here.
Create a new Deploy Target from Wercker settings named openshift with auto deploy checked for master branch. Then add the following environment variable:
OPENSHIFT_SSH_KEY: It is a ssh key pair and choose the one that we had just created.OPENSHIFT_HOST: The application url from openshift withouthttp://. Use the url withrhcloud.comdomain even if you are using a custom domain.OPENSHIFT_GIT_URL: It is git url that we get from the OpenShift application page.OPENSHIFT_BRANCH: The branch to which you want to upload to. It is generallymasterbranch.EMAIL_ADDRESS: Your email address in GitHub.USER_NAME: Your username in GitHub.
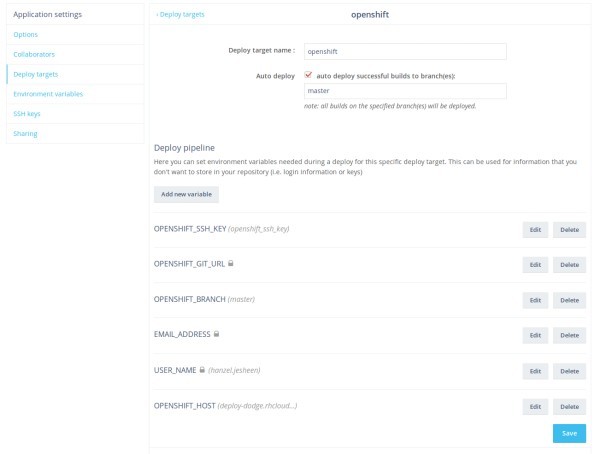 Wercker Settings
There are four steps in the deploy pipeline.
- Add the private ssh key and host to access openshift.
- Add the openshift host to
known hostslist. - Set up git configurations like name, email and default push settings.
- Push the code using
git push.
So the entire code for wercker.yml will look like this.
box: node
build:
  steps:
    - script:
        name: echo nodejs information
        code: |
          echo "node version $(node -v) running"
          echo "npm version $(npm -v) running"
    - npm-install
    - npm-test

deploy:
  openshift:
    - add-ssh-key:
        keyname: OPENSHIFT_SSH_KEY
        host: $OPENSHIFT_HOST
    - add-to-known_hosts:
        hostname: $OPENSHIFT_HOST
    - script:
        name: git setup
        code: |
          git config --global user.email $EMAIL_ADDRESS
          git config --global user.name $USER_NAME
          git config --global push.default matching
    - script:
        name: deploy
        code: |
          git push $OPENSHIFT_GIT_URL $OPENSHIFT_BRANCH
Conclusion
This covers the basics of Continuous Integration and deployment to OpenShift with Travis CI and Wercker. Even though this article is covering a Node.js application, the ideas can be used for any language projects. Also, the code can be modified to deploy to other cloud hosts such as Amazon S3, Heroku, etc.